I was recently able to trade one of my extra CMS 9619 SBCs for a CMS 9600A MPU (Thanks Joel!). This EXORbus processor card has very similar specs and layout to the CMS 9609 MPU card, but it uses the Motorola 6802 processor (an MC6800 with integrated RAM), rather than the MC6809.

|

|
If you are ambitious enough, you could even modify the CMS 9600A to use a MC6809 processor. Neither of these boards are as advanced as the CMS 9619 single board computer I have been working on, but nonetheless, I have been eager to get my hands on a MC6800 system to play with.
The board is in great condition, but had some areas of concern:
- There are no RS232 line drivers installed, instead using DIP program headers/shunts in their place.
- There is no boot or debugger ROM installed.
I mostly addressed the second concern before I even received the board. I OCR'd and transcribed the SYSMON debugger from the source code in the CMS 9600 manual (thanks for the scan Roland!). With a few adjustments, I was able to assemble it and format it for programing to EEPROM. Unfortunately, I could not get my AT26C16 EEPROMs to program in-circuit as I have for the AT28C64 EEPROMs. Anyway, I ended up using an adapter to use 1/4 of an AT28C64 EEPROM for testing.
As for the missing RS232 line drivers, this board was configured to use external line drivers on an RS232 breakout module (likely the CMS 9601-501). I tried connecting the appropriate serial lines directly to a TTL to USB serial adapter, but I did not receive any response from the board. I decided to just buy and install the line drivers to be consistent with my other CMS boards. This would eliminate a few variables while I focused on getting everything to boot from the EEPROM. Once I installed them it became clear that the new drivers were interferring with the baud rate generator due to an unusual wired jumper configuration that was causing contention. I removed some of the wire wrap jumpers so the settings are more consistent with my CMS 9609 board, and observed a nice clock signal arriving to the ACIAs.
Next, I added a small jumper to bring a constant 12V to the Power Failure Protect/Restart Circuit (connect 12V VIA to the "CR2" through-hole). Without it, the board stays in "locked reset" due to an assumed power failure.
While I was debugging these issues, I noticed a few distinct puffs of white smoke coming out of the CPU! I am not sure how that happened. I assume one of the address lines was pulled to ground through a test lead, but I was being quite careful. Anyway, with the CPU shot, I had to wait a few weeks for a replacement to arrive.
With a new CPU installed I was still troubleshooting with the logic analyzer when I noticed a column of asterisks in the terminal! I double checked the manual and realized that the monitor had been prompting me for a command for several reboots!
*V
FROM ADDR FF80

FF80 04 48 49 4E  5A 56 43 0D  0A 15 00 04  0D 0A 42 4B
     .HINZVC.......BK
FF90 41 44 44 20  04 0D 0A 46  52 4F 4D 20  41 44 44 52
     ADD ...FROM ADDR
FFA0 20 04 0D 0A  54 48 52 55  20 41 44 44  52 20 04 54
      ...THRU ADDR .T
FFB0 4F 20 41 44  44 52 20 04  56 41 4C 55  45 20 04 4D
     O ADDR .VALUE .M
FFC0 FA 42 45 F8  9B 47 F9 14  52 F9 35 54  FA A2 48 F9
     .BE..G..R.5T..H.
FFD0 B7 56 FD DD  49 FA 07 4A  F9 FD 46 FA  67 51 F8 1C
     .V..I..J..F..Q..
FFE0 44 FA 9D 4B  FA B4 31 F9  00 32 F8 EF  4C F8 1C 53
     D..K..1..2..L..S
FFF0 F8 1C 4F F9  B6 4E F9 B8  F8 4F F8 59  F8 54 F8 00
     ..O..N...O.Y.T..
Once I knew that everything was working, I took another stab at programming the EEPROMs in-circuit. After some jumper configuration changes on my CMS 9619A, I was finally able to program a few 28C16 EEPROMs. As it turns out, the CMS 9609 has some timing differences from the CMS 9619 that apparently prevent it from programming the EEPROMs. But with the CMS 9619 configured to accept the smaller 24 pin 28C16 EEPROM, the programming worked fine.

With everything else up and running, I wanted to try a TTL level USB/serial connection using the board's original DIP program headers, rather than the RS232 drivers that I added. Following the manual, it was easy to swap out the drivers and connect it up:

|
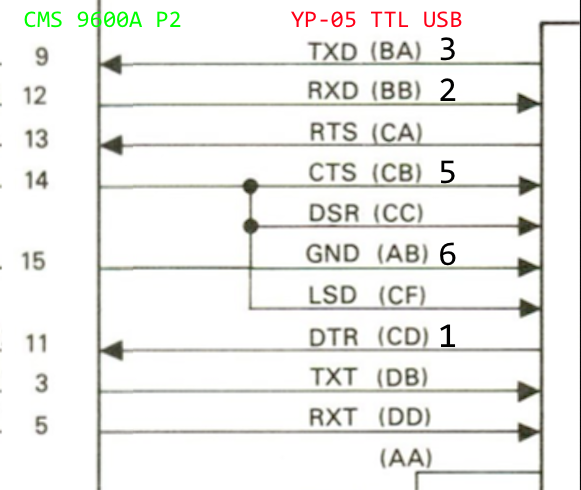
|
PHEW!
No comments:
Post a Comment