Tuesday, December 31, 2013

Setting Up the Work Environment

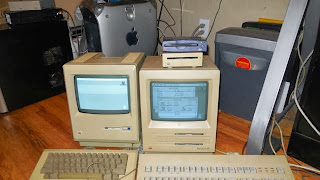
I couldn't wait any longer! I dusted off my Macs and booted them all up to make sure I wouldn't spend the whole month fixing hardware. They all work!

Mac G4, 128K, SE

Hardware

Basically, I will be using a PowerMac G4 to do the software development and the Macintosh SE for initial testing. I decided to do testing on the Mac SE for a few reasons:

  • faster serial ports for data transfer;
  • ethernet card installed (broken?);
  • MacTCP and FreePPP installed for comparison testing;
  • SCSI port and a harddrive;
  • more robust System software (System 7.1);
  • same Motorola 68k processor as the 128K.
This should make testing much less painful. If I get anything working on the SE, I can give it a try on the Mac 128K. I have an external SCSI zip drive that seems to work well as an external harddrive (and lots of zip disks!).

Sunday, December 29, 2013

Gearing up for RetroChallenge!

These beauties just came in the mail:
Why buy one when you can buy 10 at 10 times the price? $20 on ebay seemed like pretty good deal. I've had good luck with zip drives. They are easy to find at thrift stores, and protocols span from SCSI to ATA to USB which makes them good for data transfer between old and new systems. They work great as a boot drive for classic macs (back to the Macintosh Plus) and let you organize a lot of data in a small space. I've had enough CDs fail that I actually prefer these guys for long term storage of retro software.

Wednesday, December 4, 2013

RetroChallenge 2014WW Entry

I have again entered the RetroChallenge! This time I will be using my Apple Power Macintosh G4 500 DP from the year 2000 to compile some programs. Now, even though this computer is technically eligible for the RetroChallenge, the real "retro" part is that the program I will be compiling is for the Apple Macintosh, as in, the original 128K Macintosh from 1984. I will be using the Classic Environment of Mac OS X 10.4 running MPW as my development environment.

As for the programming, I will attempt to port the lwIP TCP/IP stack to the original Macintosh. This Macintosh is unique because it did not have enough memory to run any commercially available networking stack. Even the 512K Macintosh had some networking possibilities. I attempted this project a number of years ago but couldn't get past the multi-thread requirement of the lwip PPP implementation. As far as I know, the original Macintosh operating system does not have any multithreading libraries or routines. I recently noticed that a branch of the lwIP code includes a PPP module that claims to not require multiple threads! So I will give this another shot. If PPP fails, I can try to get SLIP working instead.

Here is my target hardware/software flow:

Macintosh -> lwIP -> ppp ->  RS-422 -> RS-232 -> USB -> PowerMac G4 -> getty -> pppd -> THE WORLD!

Having worked on this before, and having struggled to understand how to use the code, I have a feeling I will get stuck at some point. If that happens, I will probably work on building a ROM burner to flash some Apple II ROMS or work in my Apple IIgs.

Saturday, November 23, 2013

RetroChallenge 2014WW Prizes

Not totally sure what I am going to do yet, but I am definitely offering these items up as prizes:

I can't guarantee that the keyboard still works, but it did 5 months ago!

Thursday, August 1, 2013

Major Setback and final Push to the End

Last weekend as I was adding some features to my BAM program, I started having keyboard issues again. I found some new continuity problems on the ribbon cable due to stress from bending. I tried a few things to fix the problem, as I didn't want to keep cutting back the ribbon cable. I thought I could solder a little bridge on the cable, but the soldering pen melted right through the plastic. The traces are too thin to solder. I tried taping on aluminum foil traces with mixed results. In the end, I had to just keep cutting the ribbon cable back to an area without cracks. I barely finished that tonight.

I had some new features I wanted to add to BAM, but I quickly ran out of memory, so I couldn't implement scoring, marking mines or verifying that you found them all. So the game is pretty incomplete, but that's all I could fit in memory. I also picked up some pretty horrible coding practices from tricks to save memory on the TS1000. Things like: 10 LET O=PI-PI 20 LET I=PI/PI
Then using "O" and "I" instead of 0 and 1. Apparently, this saves memory by evaluating math with the constant PI, rather than the 5 byte long numbers for 1 and 0.

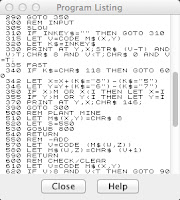
Anyway, I'm done. The BAM game is available for download as a .P file, but it's not that exciting. It's really quite sad considering the time I spent on it. I just found myself unable to be productive with only 2k of memory and a difficult to use BASIC editor. The source is listed below in image grabs from the impressive TapeConverter program for ZX81.

I never got around to making the memory expansion card with all of the keyboard issues, although I do have the parts ready to solder.

As promised, I am also offering up the working TS1000 as a prize in the RetroChallenge. I wouldn't mind keeping it for 6 months and giving it away at the end of next year's Winter Warmup, but I'll leave that up to the organizers.

Thanks for the memories TS1000!

Thursday, July 25, 2013

Working BAM

I have a working game! Lots of features aren't implemented yet, like scoring and auto clearing areas, but it works! I learned some interesting tricks to reduce the memory size. One of the most novel I found online is for moving a cursor:

20 LET Y=Y+(INKEY$="6")-(INKEY$="7") 25 LET X=X+(INKEY$="8")-(INKEY$="5")

This little snippet replaces 4 lines of normal IF, THEN code by taking advantage of the fact that the INKEY$ comparison resolves to 1 or 0. Adding and subtracting the result for the various keys moves the stored cursor coordinates. I have to say, I really like the Sinclair implementation of BASIC. It has some printing and comparison features that are lacking in Applesoft BASIC. However, the only thing that made programming bearable was writing out the entire program before trying to enter it. Data entry and minor editing is not too bad, but trying to think out a program on the TS1000 is not fun. I will make the source and a download available shortly.

Wednesday, July 24, 2013

3 Revelations

Programming the TS1000 is like programming punch cards

Well, I have never programmed a punch card computer, but after several days of total frustration trying to enter, test and edit a BASIC program on the TS1000, I gave up. I haven't completely given up *BAM*, I am just writing it on my MacBook, in a text editor, and then entering it into the TS1000. This reminds me of how programmers used to have to write out their programs before trying to enter them on a punch card. The TS1000 is too slow to provide a good interface for stream of consciousness BASIC program editing. By the time I get a line entered, I forget what I was trying to do. I have spent many hours working on a simple program which I could have probably finished in just a few hours on an Apple II. I'm sure that machine language programs for the Z80 processor are really the TS1000's strong suit, but unfortunately, that's not what I'm working on.

Know your data types

I was running out of memory very quickly when setting up the game board for minesweeper. The board is represented by a 12x12 2-dimensional array of numbers with values 0 to 9. Little did I know that a number in Sinclair BASIC is represented by 5 bytes. As a result, I was using 720 bytes of memory, over a third of the memory of the TS1000, just to do some basic addition on the numbers. Instead I will use an array of strings. It too is a 2-dimensional array, but should only take up 144 bytes, plus some overhead. The result will be a slower program (to convert from character to number and back), but way less memory use.

Minesweeper has been done on the ZX81

Finding some existing minesweeper programs online for the ZX81 was a bit disappointing. However, I don't think either of them run in the standard 2k of memory for the TS1000 (although I haven't tried either of them). Even though I received my RAM chip for the upgrade, I really want to get this running in the standard configuration. So I'll keep working on this thing.

Sunday, July 21, 2013

Report Code 4

...means "Not enough room in memory." Great. My menus were working perfectly, and I started on the actual minesweeper game logic, when I started getting report code 4 errors. So, there isn't enough room in RAM for a menu and the game. Even reducing the size of the menu names didn't help much. I will be spending the next hour deleting my last 2 days worth of work. One last picture of completed menus for posterity:

Saturday, July 20, 2013

Even FAST is SLOW

My BAM minesweeper menu system is now fully functional. Ugh, I should be done with the whole program by now. Keyboard entry on the TS1000 BASIC editor is incredibly slow. I am used to the membrane keyboard now, but you still have to wait for the screen to refresh before entering a new character, even in fast mode. Also, the editor is acting funny lately and not allowing me to EDIT existing lines. Maybe I am having memory issues?

SAVEing and LOADing is working extremely well with Audacity. I have set up a sort of version control with the audio clips. Audacity lets you mute and minimize clips as you go, and save many clips in the same project. So, I can keep all of my old saves in one project, and still play and record just the latest audio clip.

Finally, I ordered the SRAM chip I need to upgrade the RAM on the TS1000. That should be a fun project, if it arrives in time.

Friday, July 19, 2013

BASIC Programming TS1000 Style

I've picked a name for my Minesweeper program: "**BAM**" (British American Minesweeper). This is a nod to the British/American collaboration that is the Timex/Sinclair 1000, the British/American nature of my American entry into the British organized Retrochallenge, and the British American Minesweepers of WWII, known as BAMs. And of course, when you hit a mine it goes "BAM!" Well, maybe not on the TS1000, because it doesn't have a speaker. The screenshot shows my menu system up and running.

I'm getting the hang of programming on the TS1000. Progress is SLOW. A few tips I have learned:

  • Enter the FAST command to greatly speed up screen refresh during BASIC program editing. Also, the resulting screen flash during redraw gives some feedback as to whether the computer received the key you are typing.
  • Use the LIST command with a line number to jump to that line and scroll the editor there.
  • If the program is no longer outputting text, it is probably because you spelled out "AT" or some other keyword, rather than using the correct key.

I really hope game play is faster than BASIC program editing.

Thursday, July 18, 2013

Success SAVEing & LOADing

I bought the adapter I needed to convert from the mono headphone jack on the TS1000 to the RCA/phono jack on my iGrabber USB audio/video capture device, and then I promptly lost it before I could get it home. I borrowed another one and was finally able to get everything hooked up to my satisfaction. After a lot of experimentation I figured out a setup that gave me reliable results on my MacBook Air. I used Audacity to record and playback the audio clips.

  1. On the TS1000, input SAVE "X"
  2. In Audacity, record with the "Input Volume" at 1.0 (max)
  3. Select the clip and use the "Amplify" effect with a setting of 40dB. This gives a "New Peak Amplitude" of about -10.8 dB. (How can you have negative dB?)
  4. On the TS1000, input LOAD "X"
  5. Back in Audacity, play back at 1.0 "Output Volume" (max) and full system volume.
You can get a pretty good idea of when the TS1000 is LOADing the data by when the video changes. However, using the full 50dB Amplify Effect caused the TS1000 to appear to LOAD without error, but no data was actually there when I pressed LIST. That could have been a SAVE error though.

Finally I can start writing an actual program!

Thursday, July 11, 2013

Harsh, High Pitched Buzz!

After a little research, I learned you can't break your TS1000 by putting the 9v power plug in the wrong jack. This makes sense considering the 3 identical jacks on the TS1000 and how close they are.

I couldn't find any help with my audio problem online, so I started experimenting with the mini phone plug to phono (headphone to RCA) adapter that connects to my USB A/V capture dongle. As it turns out, the problem is with how the stereo adapter connects to the mono jack of the TS1000. One of the lines is crossed or grounded which is making a humming buzz loud enough to cover up the data audio. Connecting the tip of one of the phono plugs to the collar of the phono jack on my USB capture device gets rid of the humming. The data audio is then clearly audible (sounds like a modem). In the end, I was eventually able to SAVE a program on my laptop using Audacity, amplify it, then play it back. I haven't been able to get the TS1000 to LOAD the data again though. I'm sure many people have done this before, so I will do some more research. Also, I will try to pick up the correct mono adapter plug tomorrow.

Wednesday, July 10, 2013

Stable at Last

Sorry for the lack of updates. I suffered a particularly gruesome injury to my finger this past weekend while working on another project. Nothing a little super glue and duct tape couldn't fix.

I fixed the loose ground strap tonight. I used a soldering attachment for a propane torch which worked perfectly. My little soldering iron was not going to get hot enough to heat everything up. The TS1000 is much more stable with the strap secured, but I still don't have audio output during a SAVE command.

The three jacks on the TS1000 are identical 3.5 mm phone connectors. It seems possible that a previous owner connected the 9v power cord to the MIC jack, frying some component. I will do some research and testing tonight to try and track down the problem.

Thursday, July 4, 2013

4th of July with the TS1000

10 PRINT "HAPPY 4TH OF JULY!"

Very close to 200 years after the end of the American Revolutionary War, the American Timex Corporation and the British company Sinclair Research came together to introduce the Timex Sinclair 1000 to America. Finally, the British had brought us affordable computer technology rather than exorbitant taxes on tea.

I spent some time today updating my blog and programming on the TS1000. I am still getting used to the membrane keyboard. It is hard to touch-type without any feedback. Although I like only having to hit one key for a BASIC command, I seem to usually end up spelling out the command anyway, then having to delete my extra typing. It can be a little hard to find some of the commands the first time also.

My biggest problem is figuring out how to save my programs. I have the MIC jack of the TS1000 hooked up to my laptop, but I just hear a "soft, humming buzz", not the "very harsh, high pitched buzz" I should expect. While the humming is certainly more pleasant sounding than the alternative, I am pretty sure there is no data in there. I haven't fixed that ground strap yet, besides taping it in place, so maybe that is part of the issue.

I think I may write a Mine Sweeper type game for this little guy. It would lend itself well to text and simple BASIC programming.

Wednesday, July 3, 2013

HELLO WORLD

Let's try this again. Type:
P "HELLO WORLD"
and the screen shows:
PRINT "HELLO WORLD"
Press the ENTER key and:
HELLO WORLD 0/0

Success!

Tuesday, July 2, 2013

Back From the Dead

Wow, the TS1000 almost went into the trash can tonight. After trying to repair the keyboard ribbon cable, I plugged it back in to test my work. Unfortunately, nothing happened. I couldn't get the TS1000 to do anything at all for about 20 minutes. I thought I had killed it for sure. As it turns out, the loose end of that poorly soldered ground strap was making a connection with another component and grounding out the TS1000. Repositioning the ground strap and applying some pressure caused it to spring back to life!

Back to the keyboard... I cut the ribbon connector back slightly to undamaged traces and cut back the the surrounding plastic to fit into the circuit board connectors.

The biggest challenge was getting the old broken bits of ribbon cable out of the circuit board connector. I kept trying to insert one of the ribbon cables into the connector but there were still some tiny plastic pieces in there blocking it. I used a thin blade to get the final bits out. I ran a test and everything but keys Q-T worked! Some continuity testing showed that the ribbon cable was not making contact on pin #2 of the connector. I had bent one of the pins slightly trying get the plastic bits out so that it was no longer making contact with the ribbon cable. I used a sewing needle to bend the pin back into place and... All the keys work! I will be adding some clear packing tape to the ribbon cable to re-enforce it for the future.

TS1000 Disassembly

Well, my statement regarding the ease of this keyboard repair was apparently premature.

I am going to stay optomistic that it is just the ribbon cable at fault because this unit looks practically new and was very complete. If the issue is stress on the ribbon cable rather than damage to the membrane, I hope I can still make a repair. Otherwise, I don't think I have the fortitude to fix this thing. Onwards...

I flip the little TS1000 over to investigate opening it up only to find the warning "No user serviceable parts inside." We'll see about that... Peel the feet off, remove the 5 screws and look inside.

At first glance, I see what appears to be a ground strap that is not connected properly. It looks like a dry solder joint due to insufficient heat on the thick strap. This is almost certainly not the cause of our keyboard issues, but it will get fixed before the TS1000 is reassembled. 2 more screws to remove the circuit board and the problem is apparent.

I had thought that the ribbon cable was a separate set of wires that connected the membrane to the circuit board. However the damaged ribbon cable is part of the membrane keyboard. Fortunately, it broke right at the circuit board, leaving plenty of good ribbon cable.

Early Problems

Turning on the TS1000 is a bit disappointing. There is no boot chime, no clattering of disk drives, not even the 'click' of a switch. You just plug it in and it's on. Very appliance-like. What you do get is black text on white screen with a [K] cursor. "Now you're ready to use your Timex/Sinclair 1000!"

The keyboard layout of the TS1000 is interesting and makes writing a BASIC program quite intuitive. Each of the letter keys, when pressed at the start of a line, represents a complete BASIC command. The keys are well marked so the keyboard acts as a summary of all the available BASIC commands.

To start, I type:
P "HELLO WORLD"
and the screen shows:
PRINT "HLLO OL"

Hmm, that's not right. Clearly my membrane keyboard is having problems. About half of the keyboard works. The number row does not work at all, the second row works starting at the 'Y' key, the third row work starting at the 'H' key, and the bottom row works until the 'B' key.

I hit the Enter key and:
HLLO OL
is dutifully printed at the top of the screen.

A review of a TS1000 keyboard wiring diagram indicates that the keys that don't work are consistent with damage to several wires on the keyboard ribbon connector. It seems my "working" TS1000 purchase doesn't work so well. Apparently, this is a pretty common problem and should be an easy fix.

Thursday, June 20, 2013

TS1000 Meets a Modern TV

So you want a Timex Sinclair 1000 but need to hook it up to a modern TV (in the U.S.). Well, there's an RCA/phono jack on it, so you can just hook it up to the composite video connection on the TV, right? Not so fast! Phono plugs were used for many RF applications in the 80's. The video from the TS1000 is an RF signal that we would expect to see from a modern CATV/antenna cable (coax with an 'F' connector). We need an adapter to plug it into the CATV/antenna jack of a modern TV. The adapters provided with the TS1000 won't work. Fortunately, you can buy the correct 'F'/RCA adapter from RadioShack for less than $4. This adapter plugs into the back of the TS1000 and you can use a standard CATV/coax patch cable to connect from the adapter to the TV. Then set the TV to channel 2 or 3 depending on the position of the channel selection switch at the bottom of the TS1000.

You can modify the TS1000 to output composite video, but the RF signal is good enough for most purposes.

Ok, now you know you can buy a TS1000 for less than $40, and you know how to hook it up to your TV. So, if you don't have one, go out, get one, and join me for the RetroChallenge!

Sunday, June 16, 2013

Timex Sinclair 1000 Background

Yes, the power is overwhelming.

The Timex Sinclair 1000 is pretty much a Sinclair ZX81 made for the North American market with 2kB of RAM and NTSC RF video output. Like the ZX81, it has a 3.5 MHz Z80A 8-bit processor and 8kB ROM with a BASIC interpreter. Its quite simple and very small compared to an Apple II. It is about the size and weight of a Kindle Fire HD. At a list price of $99.95 when introduced in 1982, it also cost about the same as a Kindle in 2013 dollars. Its small size and low price led to some limitations, most notably the small membrane keyboard, limited graphics and no sound.

I don't think I had ever heard of a Timex Sinclair until very recently, most likely due to following some of the RetroChallenge entries. You can get a working TS1000 for about $40 on ebay without trying hard. I found a fairly complete setup, advertised as working (more on that later), for less than $25 shipped so I just bought it. A Zilog Z80 based computer at such a low price was too much for me to resist. Considering the prices Apple IIs are fetching on ebay, the TS1000 is an affordable introduction to retro-computing, just as it was an affordable introduction to modern computing back in the 80's. This is the first vintage computer I have owned that isn't an Apple. I don't think my marriage can afford me expanding my computer inventory, so I don't plan on keeping this guy very long. (It is small enough to hide inside an Apple II though...)

Friday, June 14, 2013

RetroChallenge 2013SC

Welcome to my new blog. The RetroChallenge inspired me to start a new retrocomputing specific blog here. I will be moving my previous retrochallenge stuff from my other blog MacLCD over to here in the coming weeks. First, a list of goals for RetroChallenge 2013 Summer Challenge:
  • Repair the Timex Sinclair 1000 that I recently bought on a whim (and for less than $25 shipped!) from ebay. Then I will try to write a game for it in BASIC. Assuming I get it all working I will offer the computer up as a prize in the RetroChallenge.
  • Finish fixing my Apple IIGS Upgrade computer.
Since I have a busy month at work I'm going to keep my goals within reach for this challenge.

Tuesday, February 5, 2013

Updated AII-SPI-DSK source

I uploaded an updated source code archive for AII-SPI-DSK. I accidently made an error that I didn't test when I transfered over to the Intel Mac. It should run fine now.

Friday, February 1, 2013

Quick Update

Updated the downloads for the USB_AII_Disk_Emulator after moving the project to an intel mac and recompiling.

Wednesday, January 30, 2013

RetroChallenge 2013WW Review

This has been a fun month. I am really excited that I completed one project and hopefully provided a useful tool to the Apple II community.

Disk ][ Emulator: I just uploaded the USB AII-SPI-DSK executable and schematic. The binary is compiled for x86_64.

AII-SPI-DSK project source code is now available too. The code requires user to have libusb, libftdi and libmpsse already compiled and installed. Once you get past the Xcode project format, the code should be pretty portable to other platforms. Most of the coding was done fast and dirty, so please excuse the unavoidable errors.

The USB AII_SPI_DSK Disk ][ Emulator is by far my most complex electronics project I have ever taken on. Fortunately, the Apple Disk ][ controller card is pretty flexible with the input it can take, or I would have never completed this.

I didn't quite reach my lofty goals on this project, but I did end up with a good proof of concept and a handy device in its own right. And, because this project uses a standard SPI stream, I should be able to easily create a micro-controller based solution that actually uses an SD card! The Retro icing on the cake for this project is using 2 ICs recycled from an old Apple II+ for my build.

Apple IIe Platinum: Living a new dust-free life.

Apple IIGS: Still rusty and in pieces. A little closer to living though.

Apple //c: Still neglected with 255 ROMS. I didn't even get to think about this project.

Take a minute to check out the RetroChallenge website and see what the other participants worked on.

Monday, January 28, 2013

Karateka! and Schematic


I can die happy. After spending most of last night and this evening making small speed refinements to get a Karateka disk image to work, with no success, I tried a different disk image file and... Kiai! I have no explanation why one works and the other doesn't, especially since they both work on Virtual ][. (UPDATE: Karateka only loads from Slot 6, Drive 1; I was trying to load from slot 7) In any event, my program can now transfer 2 disk sectors in a single USB transfer. Just about every disk image I have tried works now. If there is a disk image that doesn't work, there seems to be another copy of it out there that does. Not so different than loading up pirated games on an Apple IIe back in the 80's.

I forgot how fun the original Mario Bros. game is. I definitely need to invest in a color monitor though.
I cleaned up my schematic. I think I could probably reduce the part count a little more, but these ICs are cheap and easy to find. Note that I broke out the write protect signal. With every bit transfered out representing a data bit, I don't have room to multiplex the write protect signal into the SPI stream.  You can also pull this to ground or the Phase 2 signal for write protected or write enabled, respectively.

1 SPI Bit per Disk Bit Achieved!

I figured I would try to get started on disk writing today, even though I doubt I can finish it before the end of the month. While I was working on it, I got side-tracked and re-visited my previous attempt to reduce the number of bits I have to send via SPI to represent a bit on disk. I put this aside after claiming success by reducing it from 4 to 2 SPI bits per disk bit at 500MHz. I was playing around with 1 bit per disk bit at 300Khz, and I was getting some errors, but it seemed close. At this speed, the read_pulse is slightly longer than the expected 1usec and the time between the start of read_pulses is shorter than the average 4usec. Then I tried 250KHz and everything just worked! At 250KHz, the read pulse is long at 2usec, but the time between the start of read_pulses is the correct 4usec. This only works due to my previous discovery of ANDing the SPI MOSI and the SPI clock lines to produce a shortened read_pulse. This probably won't work on all Apple IIs, and it may be too slow to handle disk writes, so I will keep this feature as an option for now. Unfortunately, it did not fix my latency issue, even though I am sending less data per sector. However, for the first time I can send 2 disk sectors per USB transfer, now that transfer size is down. This reduces the ~4000usec delay to once every 2 sectors. Maybe the libftdi mailing list has some input on this issue.

Saturday, January 26, 2013

Good Enough

Finding ways to reduce the latency between sector transfers is getting tougher and tougher. The UM232H writes and reads packets with low latency, but when it goes back and forth between the two, significant delays occur.

I used some source code from MAME to load the different disk image formats. I had to make extensive edits to get it working outside of MAME though. ProDos and DOS 3.3 disks work fine. Most game disk images I have tried are working:
  • Moonpatrol
  • Choplifter
  • Ms. PacMan
  • Bouncing Kumungas!
  • Jungle Hunt
  • Donkey Kong
  • Mario Bros.
Still no Karateka though.
I think it is 'good enough' for now. A computer faster than my PowerBook G4 might help. Here is video of my progress:


The LCD viewfinder is broken on the camera, so I missed my shot a few times.

I added a logging level option to the command arguments after I shot this video. I can set the verbosity at run time instead of needing to re-compile. I am working on my schematic today to make sure it is up to date.

I received my surface mount resistors for the IIgs from China earlier this week. I only needed one of each, but I could only buy 100 of each. Anybody need 198 surface mount resistors?

Wednesday, January 23, 2013

Speed Testing

I have been experimenting with disk images with mixed success.  ProDos based system utilities disks work fine. No luck with Karateka though :(

I fixed a few bugs that were causing the program to not move to the correct track at times. Also, I found out that libmpsse stalling was my fault - I commented out some code to limit transfer sizes thinking it didn't look right. That was causing the UM232H to get too much data and stall out. Finally, I have been experimenting to see if I can reduce latency beween data transfers. Loading a large program is still about 10% slower than running the same disk on Virtual ][. Clearly there is some room for improvement here.

FTDI has Mac OS X drivers for the UM232H. I may test out their driver to see if there is any speed to be found there. Also FTDI recently released a simpler / cheaper version of the UM232H named the UM232H-B.  $15 is a steal! You could make a Disk ][ emulator like mine for well under $20. Mine is still under $25.

Still awaiting resistors being shipped from China for my IIgs.

Sunday, January 20, 2013

First Disk Image Read

I did it! I got a disk image to read on the Apple IIe! I had to make a few more changes to reduce the latency between sector transfers to an acceptable level for the Apple IIe:
  • Disabled almost all of my logging
  • Disabled excessive libmpsse purge buffer commands (purge rx buffer, purge tx buffer, then purge both buffers)
  • Skipped the 74LS259 addressable latch
  • Changed out a possibly bad 74LS00 ic pulled from an old Apple II+

I can use the Bag of Tricks program to assist with further speed-ups. Now, on to fixing up the mess of code I created trying to get this to work. I haven't even started on writing to a disk image yet. I will get a video up ASAP, but I dropped and broke my camera getting this screenshot.

Saturday, January 19, 2013

Fun with Logic

While I was working on testing out different possible SPI speed settings and byte configurations, I started thinking more about ways to get my 1us read pulse while running at slower than a 1Mhz transfer speed. Then it hit me: by ANDing my data out (MOSI) to the SPI clock, I can get a read pulse half the duration of SPI data output!  At 500MHz, I have a perfect read pulse of 1us and 4us between the start of consecutive pulses!

(SCLK & MOSI) = perfect READ_PULSE

After doing some research, I realized I don't even need an extra chip to do this.  I can use a 74LS00 NAND gate for several bits of logic.  By connecting the two inputs of the NAND gate, I get the NOT gate I already needed.  To get an AND gate, I connect the SCLK and SPI output to each side of the NAND gate, then I connect the output back through a NAND gate with the two inputs connected.  NAND->NOT=AND.  It's not working yet, but I think it's close.

Wednesday, January 16, 2013

Shot in the Dark

So far, I have been shooting in the dark trying to get the Disk ][ emulator to work. I have no way to tell what the Apple IIe is getting as data. Here is some AppleSoft BASIC code I wrote last night (using a Beneath Apple DOS machine language program as a guide) to see what the bytes the controller card is getting. BASIC doesn't appear to be fast enough to get more than a few bytes per 'rotation' of the disk, but at least I can get a general idea of whether I am sending any valid data over. I am using this to experiment with different SPI clock speeds and byte formats.

10 SLOT6 = 49376: REM $C0E0 20 DRIVE1 = PEEK (SLOT6 + 10) 25 REM DRIVE2 = PEEK(SLOT6+11) 30 REED = PEEK (SLOT6 + 14) 40 DRIVESTART = PEEK (SLOT6 + 9) 50 DIM BYTES(255) 52 FOR X = 0 TO 254 54 BYTES(X) = PEEK (SLOT6 + 12) 56 REM IF BYTES(X) < 128 THEN X = X - 1 58 NEXT X 60 WPROTECT = PEEK (SLOT6 + 8) 90 HOME 100 FOR X = 0 TO 254 130 IF BYTES(X) = 255 THEN INVERSE 140 PRINT BYTES(X); SPC( 2) 150 NORMAL 160 NEXT X 170 END

Monday, January 14, 2013

Hardware Changes and Issues

Dual Row 20 pin header break outToday I took some time to:
  • reconfigure my hardware to use the 74LS161 counter
  • replace the 74LS151 with a 74LS251 multiplexer (same but with 3-state output)
  • switch some wires around to account for the Disk ][ sending data MSB first
  • make a 2x10 (20 pin) header breakout board so I can access all of the lines from the Unidisk cable
A normal solderless breadboard has a gap in the middle that is too wide for a dual row pin header. The breakout board spans the gap.

While making all these modifications I figured out what change I had previously made to get the input from the disk controller working consistently. I was getting strange output because the multiplexer did not have time to set up the data before being read. Through trial and error, I had inverted the clock signal to the counter. Inverting the clock signal gave a half a cycle difference between the multiplexer selecting the line and the UM232H capturing the data, more than enough time for the data to get set up properly. Once I reduced the transfer size, input started working perfectly. I have now implemented this fix in software by selecting SPI mode 2 which captures data on falling clock edge. Exciting stuff, I know!

However, that wasn't the only problem I temporarily bypassed. Reducing the size of my transfers previously fixed the libmpsse stalling problem. Once I wrote functions to transfer full disk sectors, the stalling problem reared its head again. The transfer buffer of the UM232H is 1kB. A raw Apple II disk sector is 416 bytes. When I convert the sector into my SPI stream it quadruples to 1664 bytes. This is too big for a single transfer to the UM232H. libmpsse is supposed to automatically break this up into several USB transfers. Instead, it is stalling the UM232H for some reason. Even if it was working right, the buffer size is a serious problem. I can't take a break in the middle of transferring a disk sector to get more USB data - the Apple II would certainly indicate a disk error. Somehow, I need to reduce the number of SPI bits I transfer to represent a disk bit. I think I may be able to do 2 SPI bits per disk bit and slow the transfer down a little bit. This will cause the read pulse to be slightly longer than ideal and the time between pulses to be slightly shorter than ideal, but it might still work. Incidentally, this wouldn't be a problem on a microcontroller which would not have to wait for a USB transfer to get more data.

Friday, January 11, 2013

Coding all Week

This past week I spent most of my free time after work writing code. Mostly:
  • a main loop
  • lots of logging functions
  • a function to translate the active phase line to an absolute track location on the disk image
  • a function to load a NIC disk image file from disk and break it into tracks
  • a function to convert a bit of disk data into four bits of SPI data that hopefully conforms to the Disk ][ read pulse
I am trying to use the NIC disk image format from the SDISKII project for now. It is the most similar to the raw stream coming from the Disk ][ drive. A normal .nib image is not much different and should be easy to implement once I get this thing working - which it certainly isn't...

If you are keeping score, my goal was to have a disk emulator that did not use a special image format, did not need a connection to another computer, and could use SD cards. At this point, the disk emulator doesn't work, it uses a special image format, it requires a USB connection to another computer, and it does not use SD cards. UGH. At least I still have a few weeks. No time to fix it this weekend, family stuff to do.

Tuesday, January 8, 2013

Disk ][ Controller Card Output Update!

Finally, I am able to read some consistent bytes from the controller card that look like I would expect! However, I am not totally sure why it is suddenly working...

Sunday, January 6, 2013

IIGS Upgrade Change of Plans

I have been struggling to get libftdispi to output anything of use and dealing with libmpsse constantly freezing the UM232H, so I decided to try a change of challenges for the day:

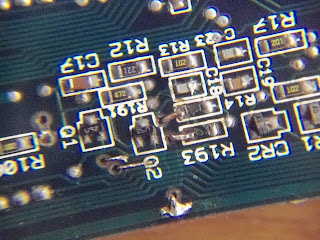
I have been checking ebay for a good deal on a IIGS logic board. I finally found one for a good price and it's local so I can avoid shipping costs. However, after taking a close look at the pictures of the board, I realized that the standard IIGS logic board does not have the connectors for the Apple IIe power supply and keyboard (it does have the solder points though). Fortunately, the connectors are pretty standard. I figured though, if I am going to have to pay over $40 to solder connectors on a new logic board, I may as well try to repair my own board. So the logic board went into the dishwasher to get cleaned up. I have had good results cleaning a board this way, just make sure to dry it off completely! The board is a mess. There are vias that are corroded completely through, leaving a cumbly substance behind. There are traces that are completely gone. Some traces are corroded under the solder-mask, so you can't even tell there is a problem at first. There are surface mount resistors that have a pad corroded through. A couple of hours of mask scraping, continuity testing and soldering tiny wires got me here:

Repairs to Battery AreaRepairs to Back of Board

Resistors R193 and R14 had to be removed

Now I have to find the appropriate resistors to replace the corroded ones. I can't find any surface mount components locally, so off to ebay...

Saturday, January 5, 2013

Initial Schematic and Hardware

Here is the schematic that I have been working on for the past week, and my first attempt to breadboard the input portion so I can read the head control ("phase") lines. I already noticed some problems. The FTDI UM232H is master SPI only, and I drew up the schematic as a master also. I already fixed it on the breadboard. Also, I eventually need some 3-state outputs on the disk and SPI bus. Finally, I have not settled on the 74LS192 counter. I chose it because I thought I could get away without a NOT gate, but I realized I needed one anyway (the 74LS04N). A 74LS161 counter is probably more readily available (4 of them in an Apple II even), and can do everything I need. Since my last post I discovered that there are not one, but two enable lines in the DB-19 connector, so this has been accounted for. The cable is from an old 5.25" Unidisk. DB-19 connectors are very hard to find.

As for the software, I have compiled and am experimenting with libftdispi and libmpsse (which appears more complete). Unfortunately, I am not having much luck with either of them past identifying and initializing the UM232H. Both of these require libftdi which requires libusb. Using these libraries should make the program very easy or trivial to port to other platforms.


Initial SchematicInitial Assembly - Left to right: UM232H, 74LS259, 74LS192, 74LS04, 74LS15, Unidisk cable

Wednesday, January 2, 2013

Apple Disk ][ Emulator Background Ramblings

While I am working on the layout of my Apple Disk ][ emulator, I thought I would give a bit of background on the Disk ][ and my plan to conquer it.
Functional Digram of Disk II

from 'Understanding the Apple II' by Jim Sather

The Apple Disk ][ was a major achievement for Apple and Steve Wozniak. They were able to replace a large number of logic ICs on a standard disk controller with a ROM-based state machine or "Logic State Sequencer ROM". The disk head is positioned by direct software control of the head stepper, rather than an absolute positioning system. To get to absolute track zero, the controller slams the head against the stopper repeatedly, causing the loud clatter recognizable as the Apple II start-up sound. This head control accounts for 4 wires connecting the drive and the controller card. The drive is enabled by an additional line that activates the drive motor and serves as a drive select. Writing is handled by two lines; the write request, which puts the magnetic head in the write state, and the actual write data serial line. There are +5v, +12v and GND power lines. Finally, there is a write protect line that indicates whether there is a notch in the disk, and a serial read pulse line. The read pulse is controlled by a special IC that outputs a 1us pulse for every field reversal on the disk. The interval between the start of consecutive write pulses is about 4us. The data transfer is asynchronous, with no clock line, but allows for some variability in when the read pulse can occur.

With this information, my plan is to convert all of this into an SPI serial stream. The 4 head stepper lines, 2 write lines and 1 enable line will be multiplexed into an 8 bit/byte serial stream (with one empty 'reserved' bit). The read pulse will be 'emulated' by 4 bits of data: 1 high bit, and 3 low bits for every read pulse. At a 1MHz transfer speed, we end up with a 1us high pulse, and 3us low, for a total of 4us. Just what the Disk ][ controller card needs! To add the write protect, I can add another line, or multiplex it into the read pulse since we have 2-3 bits of empty data that will always be low. The clock line can be from the drive controller card or the micro-controller. The main problem it that the emulator will need to transfer 4 bits of SPI data for every 1 bit of Disk ][ data. Still, this is better than my original plan of 8 bits SPI/1 bit of Disk ][ at 2MHz. The benefit is that the SPI transfer can be easily handled natively by a typical micro-controller. No processor intensive bit-banging is required. Also, we don't need a micro-controller at all to handle the timing: it is built into the SPI transfer. We'll see if these advantages make up for the extra bit shifting required.

By the way, I have decided to use the FTDI UM232H for my proof-of-concept rather than the Arduino/Atmega AVR. The FTDI chip puts out a nice square SPI wave, with no delay between bytes like the megaAVR. This is important for our timing sensitive abuse of SPI. However, this might not be an issue at the slow speed we are going. Also, I am familiar with libusb which I can use to control the FTDI chip and not so familiar with the Arduino IDE (although it looks easy enough).
Tuesday, January 1, 2013

First IIe Challenge Completed!

] PRINT "HAPPY NEW YEAR!"
For the first day of the Retrochallenge, I tackled what appeared to be the easiest project: getting my latest purchase, an Apple IIe Platinum, up and running. With the help of my air compressor and a clean paint brush, I managed to get all of the dust out of it. I booted 'er up and was greeted with Apple //e at the top of the screen! However, Control-Reset was not giving me an Applesoft BASIC prompt. I pulled the floppy disk controller card, rebooted and got a prompt, but I still couldn't reset the computer. I narrowed the problem down to a bad Reset key which looked bent out of whack to begin with. Some continuity testing showed that the key was not making contact. So: disassemble computer, de-solder, disassemble key, straighten the bent contacts until the key works, re-assemble key, solder it in, re-assemble computer. I replaced about five missing screws on the keyboard too. It looks like a previous owner tried to fix it and left the screws out. This was putting stress on the solder joints of the keys. I also managed to dig up a platinum Apple Mouse to match the computer and connect to the Mouse Interface card. Anyway, she works! Success on the first day!? Maybe I should stop while I am ahead...

de-soldered reset keyre-soldered reset key
Key removed - note missing screw for brass standoffKey soldered in with new screws
development techclean Apple IIe platinum
No more dust- much better!Target Environment:

Apple IIe, solderless breadboard, Disk Interface card,

FTDI UM232H or Arduino Nano?, 74LS series ICs